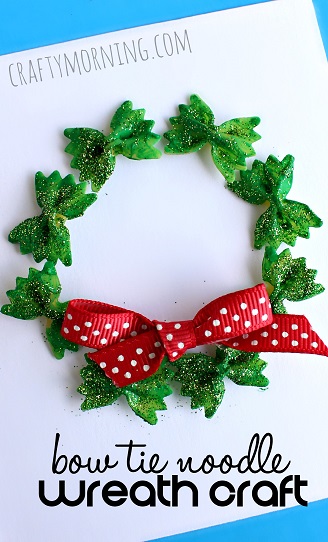
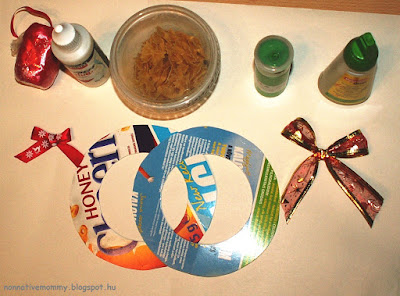
What you need:
* pasta (farfalle)
* green paint
* paintbrush
* glue
* cardboard ring (cut out of a cereal box)
* red ribbon/bow
* glitter sprinkle (I left it out this time as E. loves to spread it all over the flat)
How to make it:
Cut out the cardboard ring beforehand for your child. Let the kid paint the pasta green and let them dry. Glue them on the cardboard ring in a circle. Tie a bow (I tied it) and glue it on. You can hang it on a door with some more ribbon.
In our case E. wasn't in the mood to finish the wreath after having finished with the painting. She started to paint her apron and hair, then it was time to stop.
here still happily painting the pasta
We'll get back to this project later on as the outcome is so sweet.
Though we used a lot of English phrases:
-This kind of pasta is called farfalle.
- I have paint all over my hand.
- Can I get some more paint?
- I don't want to do it any more.
---o---o---o---o--- UPDATE---o---o---o---o--- coming soon---o---o---o---o---
It should have turned out something like this... but better later than never...
- Christmas dominoes + Santa patterning and reindeer puzzles with numbers (Day 8)
Source: http://www.activityvillage.co.uk/christmas-dominoes
If she hadn't been interested in the dominoes, I had a plan B this time. Finally, we did the plan B tasks as well since there was a lot of time before dinner.
Source: http://gyereketeto.hu/kiemelt/mikulas-minibook (Santa and reindeer puzzles)
Christmas tree puzzle (Day 9)As E. spent the afternoon with her Grandma, I didn't want to put great pressure on either of them so I'd just prepared all the previous tasks and this extra one. E. showed them all to her Grandma and played with them all afternoon... this time in Hungarian.
No photos have been taken but here is the source where you can find the Christmas tree puzzle (Part 1)
Sticker Christmas tree (Day 10)
I printed out a Christmas tree template from the internet and made some dark green and light green cardboard Christmas trees. St. Nicolas has brought E. loads of Chritsmassy and winter stickers (with owls, snowmen, snowflakes, Christmas trees, presents etc.) so I wanted her to use them in this activity.
She needed to decorate the Christmas trees but there was a tiny bit of educational twist. I wrote letters on the trees and she had to cover each with a sticker. She needed to use a sticker which started with the same letter (C - candy cane or Christmas tree, B - bell, S - star, snowflake, snowman, G - gingerbread man, A - angel, P - present etc.) The dark tree had letters corresponding Hungarian words and the light green trees the English ones. (We did this task in two or three rounds)
She enjoyed it soooo much, she was busy with it for 40-45 minutes each time. (Sometimes she asked for a letter so she could cover it with something special (H for holly, for instance).
As I made the same number of trees as we are in the family, Daddy and I helped out a bit. (Not as if she'd needed any, just for fun. It could be a great family activity.)
When she'd finished with all the trees, I stuck them up on a ribbon in a line and displayed it on her door frame. She likes it a lot. Mostly the little green bell at the bottom (you can't see it in the photo.)
Make a Christmas card for a friend (Straw Christmas tree) (Day 11)
Again I prepared everything for her beforehand. A A5 size construction paper (yellow) folded in half. Inside I wrote MERRY CHRISTMAS! (in capitals) and signed some spots with crosses where she could stick her stickers (we are in a sticker craze phase). I'd also cut up some straws (red and green) with different length so she can build a Christmas tree in the front (of course I provided her with some glue too.)
First, she stuck in the Christmas stickers.
Second, she traced the letters in Merry Christmas and signed the card.
Lastly, she built the Christmas tree on the front (She wanted to put a star on the top - "Can I get a star? I want to put it on top" so I gave her a golden felt one - this is what I could find.) She needed help with the straws as they were too thin for her little hands. But the final result was really nice. (Here is a very bad quality shot of the card. I had very little time to take photos as B. came earlier and we really needed to focus on finishing the card. But you can get the idea.)
Christmas ornaments: baubles filled with pompoms (Day 12)
(present for the nursery teachers)
From last year I had two plastic baubles which can be taken apart. I gave E. some pompoms (red, yellow and green - some of them sparkly) and jingle bells (gold and silver). She needed to decide what colour combination she wished to fill the baubles with. It was also her choice which bauble would go to which nursery teacher. (The light/dark green is for R. and the red and yellow is for M.)
It's a real easy craft (the only thing I did at the end was fixing the bottom of the baubles with transparent cello-tape and tied a ribbon on it.) Even a 2 year old can do it. What's more, you can fill the bauble up with anything: beads, ribbons, nuts, fake snow, coloured rice, tiny Kinder egg objects, torn crepe paper etc. - you name it)
Christmassy pre-writing practice (Day 13)
As I have already mentioned I found a great Christmas pack for preschoolers (it has a version for toddlers too - see the source information bellow), which offers a great number of activities: puzzles, pre-writing activities, find the difference, memory games - just to name a few). So I printed some of the pages and used them separately, like these two types:
*Which one is different?
*Pre-writing sheets in Christmas style.
Source: http://www.3dinosaurs.com/printables/packs/christmas.php (part 1)
And also this Santa and stocking matching activity from gyereketeto.hu
Source: http://gyereketeto.hu/kiemelt/mikulas-minibook
I'll be back with some more activities hidden in our advent calendar.
Here's a teaser:


No comments:
Post a Comment